
Reading and Updating an Excel Database
Excel is not a database. . . until it is. Self-Referencing Queries – SRQs – allow Excel to easily execute the four standard database functions:
- Create,
- Read,
- Update, and
- Delete
Check out our prior post for an overview of how these work. This time, we’ll dig into the Read and Update functions, looking at the Power Query code and worksheet set-up that powers them.
The Input Sheet
In a database table, columns describe a single piece of data. For instance, sales data might include date, customer, order number, SKU, quantity, and price as the columns. Each row is a single, distinct record in the database. So, if a single order contained five items, there would be five records for that order.
If you have thousands of orders and want to review a single one, you don’t want to scroll through the database looking for the records. You want to see all the relevant records in a single place. That’s where the SRQ structure employs an Input Sheet.
Users should never directly access a database. They should always review or edit records separate from the database, to maintain database security and integrity.
The Input Sheet creates a safe, friendly environment where the user can select, review, and edit a record or set of records. It does that through:
- A limited, clear depiction of the relevant record(s).
- Validation controls applied to cells, protecting data integrity against manual entry errors.
- Locked cells to prevent the user from changing values outside their purview.

Extracting Records to Read/Update
Power Query populates the Input Sheet with data from the master database table. In this example, the Input Sheet allows us to read or update data for a single customer in our Customer database.
One (or more) cells on the Input Sheet are designated as our primary key cells. They identify what makes a record unique. In this case, it is the customer name.
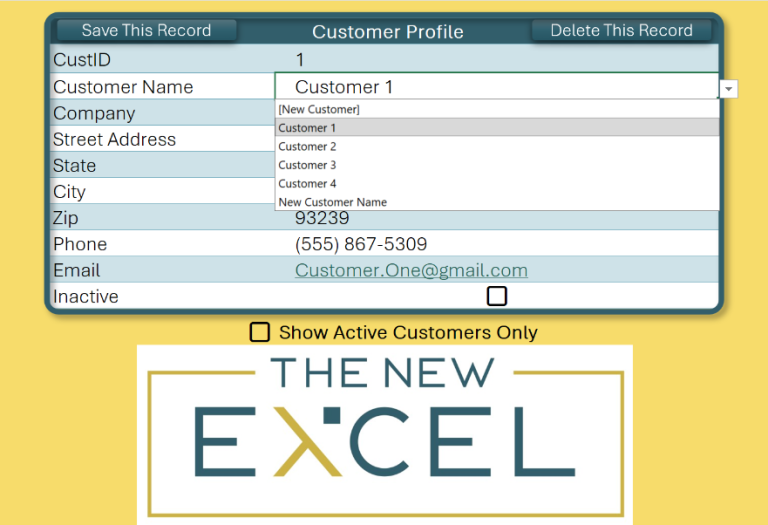
The user selects a customer name, and that customer’s information is read from the database and applied to the page. The user may now update this information.
Let’s look at the Power Query code to see how this information is found.
Power Query Input Record
The input query walks through three steps:
- The Source is the master Customers table on the worksheet.
- The Target ID number is found on the Input Sheet.
- The master Customer table is filtered to find the target customer’s record.
Let’s look at each of those steps in more detail.
Source
The Source is not the mCustomers SRQ found in the Power Query Editor. The input query independently pulls the data from the worksheet in its Source step. This prevents the Power Query equivalent of a circular reference.
Target ID Parameter
A hidden cell uses the formula below to find the unique CustID associated with the selected customer. It is best practice to associate records with some kind of ID number, rather than with a text string (like a name). Names can change, but numbers do not.
=XLOOKUP(rng_tgtInput,
mCustomers[Customer Name],
mCustomers[CustID],
MAX(mCustomers[CustID])+1,0)
=XLOOKUP(rng_tgtInput, mCustomers[Customer Name], mCustomers[CustID], MAX(mCustomers[CustID])+1,0)
Filter for TgtID
Using the Target ID Parameter (pTgtID), the Source table is filtered down to the relevant record(s). While the Target ID parameter in this instance is a single field, the “primary key” can comprise multiple fields. For instance, with corporate sales data, the primary key may include Quarter, Region, and Category.
Our customer input query features a bonus step that keeps the first row only. By definition, there should only be a single record for each CustID. This safety precaution prevents issues should user error inject the same ID into the master table twice.
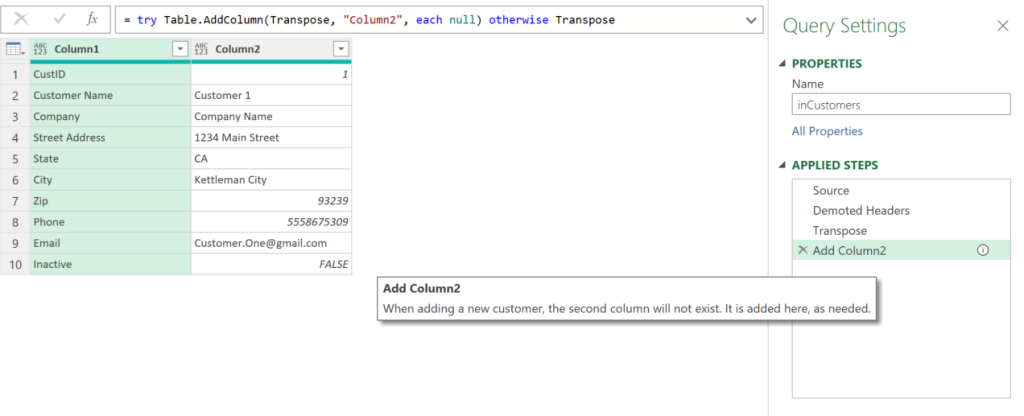
Transposing the Table
Because this query will only – and always – return just a single record, the results are transposed before returning the record to the Input Sheet. This small step creates a better user experience. It is more intuitive to enter field values vertically rather than horizontally. (Think about every form you’ve filled out online.)
Updating a Record
Record updates occur in two steps. First, the updated record is arranged in Power Query. Second, the updated record is appended to the master SRQ.
The update record is arranged through four steps:
- The updated Input Query cells are pushed back into Power Query from the worksheet.
- The table is un-transposed, returning it to a record orientation.
- input field headers are promoted to table headers.
- Data types are set for each field.
These steps turn the Input Sheet data into a table record.
At long last, we get to look at our self-referencing query. An SRQ does not simply refer to itself. Added steps allow for an automatic database update when the query is refreshed. The update occurs with the following steps:
- The query refers to itself in the Source step.
- SourceMaster establishes the master database by setting the data type for each field.
- UpdateQ pulls in the update record from above.
- Anti Merge Input takes the input record we established at the beginning and removes it from the master database.
- Append Export completes the update by appending the UpdateQ to the master database (with the input record removed).
Let’s discuss that transaction in a little more detail. The SRQ features three parts: 1) the full, initial table, 2) the extracted record, and 3) the updated record. The create, update, and delete actions occur by combining these three elements in different ways. The update action can be described with the following formula:
Updated SRQ = Initial SRQ – Extracted Record + Updated Record
For fun, take a moment to consider how those three parts will be combined to execute the create and delete actions.
Conclusion
Our SRQ infrastructure uses hidden cells, named ranges, and VBA. But those tools are simply used to populate parameters or create a seamless UI. 90% of the muscle powering these operations comes from the Input, Update, and self-referencing Master queries.
Because each of these three queries is broken into structured – but generic – steps, this logic can be quickly and easily cloned to work with new datasets in the same, or new, workbooks.
Managing and manipulating your data with Excel databases is now simple, thanks to self-referencing queries.